Draw Circle Using Drawarc Android
Canvas animations: Simple Circle Progress View on Android

The Android Course class lets united states of america draw annihilation* that we tin can imagine using basic shapes, paths, and bitmaps. The Canvas API information technology'due south actually big 🤯 and daunting at first sight. Here we're only going to scratch the surface to create our unproblematic animation.
The animation
Note
This commodity will be roofing each step for conceiving the animation merely I practice recommend reading a fleck farther: Getting started with drawing on the Android Sheet by Rebecca Franks information technology's a great read 🤓.
Ok, lets started!
You may know the drill. Create a new project, with an empty activeness, and create a class that extends from the AndroidView class:
          class CircularProgressView(
            context: Context?,
            attrs: AttributeSet?
) : View(context, attrs) {}
And now nosotros accept our set up to describe on view! 🙌
What practise we need to draw?
In society to accomplish this animation we get-go accept to know how to describe the circles, we demand i to be the background and another arc to fill the current progress.

And how can we describe it?
Each view comes with a onDraw method override which provides us with a Sheet instance for u.s. to start drawing with. To accomplish our blitheness we need to create depict 2 arcs using the sail instance, i arc for the background, and one of the tops, which volition exist the 1 to be blithe. For that, we'll demand to use the Canvas#drawArcmethod, which can let us draw a circle with nothing on the within.
Let's take a expect into it 🖌.
          public void drawArc (
            RectF            oval,
            bladder startAngle,
            float sweepAngle,
            boolean useCenter,
            Pigment            pigment
)
Nice, but what exercise they hateful?
- The
RectF ovalis just a holder for the coordinates needed to create an "invisible rectangle" in which our oval will be contained. This oval is used to define the shape and size of the arc. -
startAngle: is the caste starting point from our oval from where nosotros are going to start drawing the arc. -
sweepAngle: ways how much of the arc is going to be painted from thestartAngleto this angle. -
useCenter: the documentation explains it as, if true, include the centre of the oval in the arc, and close it if it is being stroked. This volition draw a wedge. -
paint: this is the object that provides the data to the drawing of how it should exist stroked, it's color, and more.
Drawing the groundwork circle 🎨
Now that we understand what nosotros need in order to describe an arc, let's get to the code.
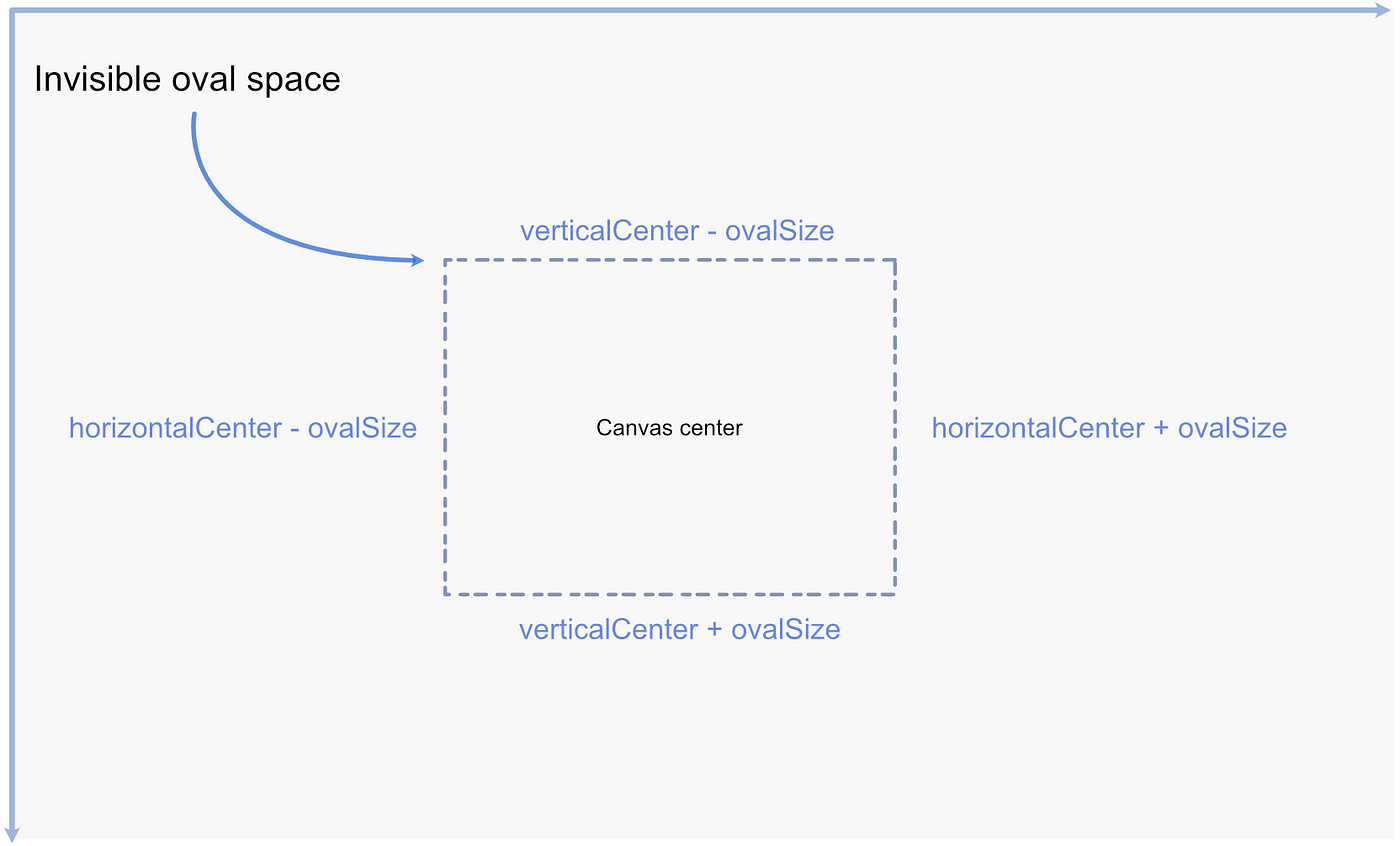
In our view'southward onDraw method nosotros should create our oval'southward RectF space with the correct dimensions nosotros want our circle progress to take:
          // ...          private val ovalSpace = RectF()                    override fun onDraw(canvas: Canvas?) {
            setSpace()
                        }private fun setSpace() {
            val horizontalCenter =            (width.div(2)).toFloat()
            val verticalCenter =            (peak.div(2)).toFloat()
            val ovalSize = 200
            ovalSpace.set(
            horizontalCenter - ovalSize,
            verticalCenter - ovalSize,
            horizontalCenter + ovalSize,
            verticalCenter + ovalSize
            )
}
As this won't be painted it would only stand for an invisible oval infinite like the following:
After we have our oval space nosotros can use the sheet object to draw our arc on it. But in order to visualize it, we demand a paint object to laissez passer the to the drawArc canvas method. Let's create it:
// ... private val parentArcColor = context?.resources?.getColor(R.color.gray_light, zip) ?: Color.GRAYprivate val parentArcPaint = Pigment().employ {
// ...
mode = Paint.Manner.STROKE
isAntiAlias = truthful
colour = parentArcColor
strokeWidth = 40f
}
The paint object arguments are self-explanatory, but a good thing to note is to:
Apply the
isAntiAliasflag to ensure your drawing has smooth edges.
And let it be a circumvolve 🎨
          // ...          override fun onDraw(sheet: Canvas?) {
            setSpace()
            sheet?.permit                        {
            it.drawArc(ovalSpace, 0f, 360f, false, parentArcPaint)
                        }
                        }
In order to see annihilation, we need to make sure our custom view is added to the main action layout. The proper noun of the custom widget will be the proper noun of our form in this case CirculaProgressView.
<com.labs.circularprogress.CircularProgressView
android:id="@+id/progress"
android:layout_width="match_parent"
android:layout_height="200dp"
app:layout_constraintBottom_toBottomOf="parent"
app:layout_constraintStart_toStartOf="parent"
app:layout_constraintEnd_toEndOf="parent"
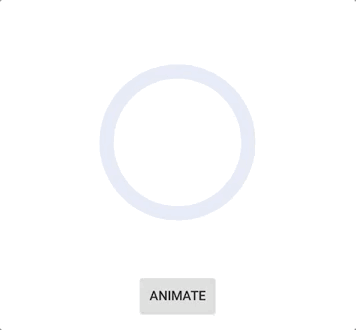
app:layout_constraintTop_toTopOf="parent" /> And we will exist able to see:

Drawing the inner circle 🎨
Now that we already know how to draw an arc, this part would be piece of cake, just declare a paint object for it and draw it on our onDraw method. There would exist a few differences, merely I'll be explaining each of the ones. Allow's encounter:
          // ...
private val fillArcPaint = Paint().apply                        {
                        style            = Pigment.Mode.STROKE
            isAntiAlias            = true
            colour            = fillArcColor
            strokeWidth            = 40f                      // i
            strokeCap            = Paint.Cap.Round
            }                    override fun onDraw(canvas: Canvas?) {
            setSpace()
            canvas?.let                        {                                              // 2
                                    drawBackgroundArc(            it            )                                              // 3
            drawInnerArc(            it            )
                        }
                        }                    individual fun drawBackgroundArc(it: Sail) {
            information technology.drawArc(ovalSpace, 0f, 360f, false, parentArcPaint)
}private fun drawInnerArc(sheet: Canvas) {
              // four
            val percentageToFill = 180f                                    // 5
            canvas.drawArc(ovalSpace, 270f, percentageToFill, fake, fillArcPaint)
}
Taking a look at the differences 🧐
-
strokeCap = Pigment.Cap.ROUNDthis would make the edge of the stroke while drawing to expect round instead of flat.

2. We moved the logic to draw the background arc into it's own functions to improve readability at the onDraw method.
3. Created another part that volition have care of drawing the inner arc.
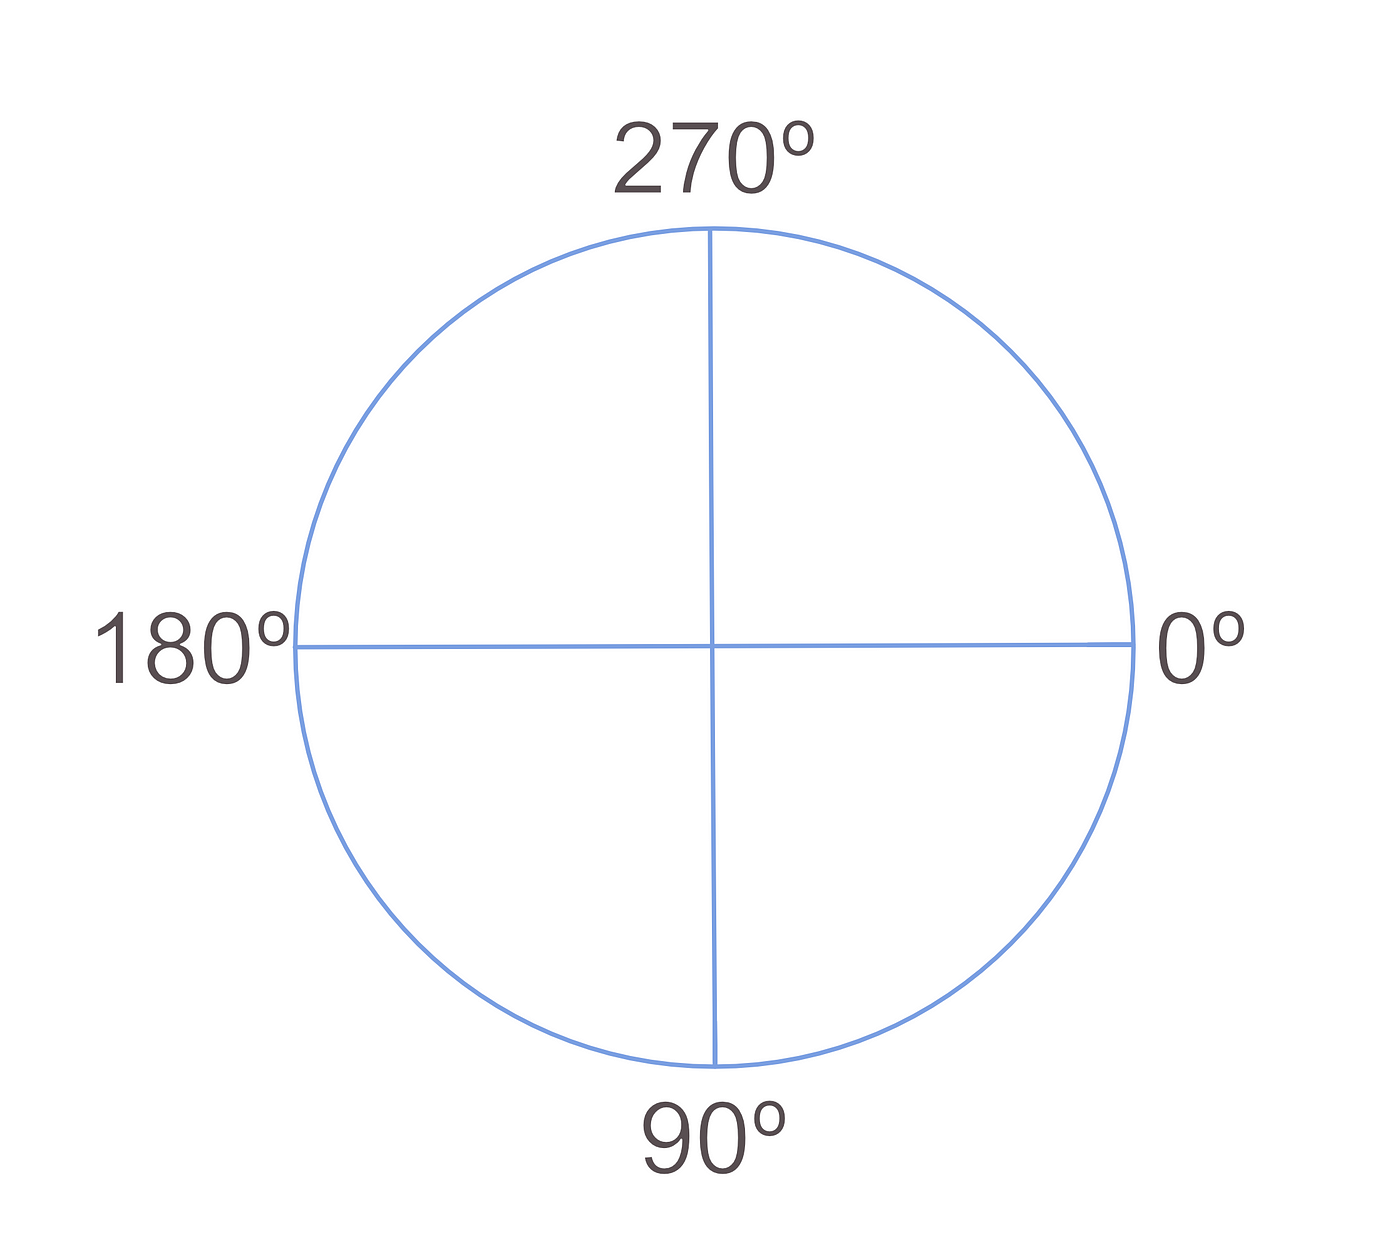
iv. We prepare the canvass#drawArc sweepAngle parameter to 180f as right now nosotros only want to draw one-half of the circle.
v. Here we can observe a 270f value for our startAngle parameter, this is because the angle diagram does not start equally we use to. The 270f value will set the startAngle at the pinnacle as you could see in the next image.
Permit'due south beginning with animations 🚀
Let's exercise a tiny recap. In order to be able to draw something, we need to specify everything that we want to show at our view onDraw part. Easy peasy right? Now… if we want to display something new in our sail nosotros need to draw everything we had before then draw the new thing we want it to appear, in our case this new thing would be an incrementing arc to show the progress.
To achieve this we need a few things:
- A value that indicates the percent of our arc to depict and that we can change dynamically that can be read from our
onDrawrole - Draw the new value
- And call a redraw for our view
- And echo
First, permit's change our drawInnerArc part to use a dynamic currentPercentage value to determine the pct fill to be drawn:
          individual var currentPercentage = 0          //...          private fun drawInnerArc(sail: Canvass) {
            val percentageToFill = getCurrentPercentageToFill()
            canvas.drawArc(ovalSpace, 270f, percentageToFill, fake, fillArcPaint)
}individual fun getCurrentPercentageToFill()            =
            (ARC_FULL_ROTATION_DEGREE *            (currentPercentage / PERCENTAGE_DIVIDER)).toFloat()
To draw the new value, nosotros have to ask the view for a redraw and this is washed b calling the view invalidate() method when a redraw is needed.
Now we'll create a part to exist called when we desire to perform the animation. Here we utilise Android's ValueAnimatorclass to helps us change the the currentPercentage value through fourth dimension and telephone call our viewinvalidate() on each alter, then it tin exist visualized.
The documentation defines the
ValueAnimatorgrade a a simple timing engine for running animations which calculate blithe values and set them on target objects.
In our example, nosotros desire to breathing from values 0% to 100%, and this class volition brand attain this animation a like shooting fish in a barrel. Then let's take a await into the code, a, I'll explain each stride on the go:
fun animateProgress() {
// 1
val valuesHolder = PropertyValuesHolder.ofFloat(
PERCENTAGE_VALUE_HOLDER,
0f,
100f
)
// 2
val animator = ValueAnimator().apply {
setValues(valuesHolder)
duration = thou
interpolator = AccelerateDecelerateInterpolator()
// 3
addUpdateListener { // four
val percentage = it.getAnimatedValue(PERCENTAGE_VALUE_HOLDER) as Bladder// 5
// 7
currentPercentage = percentage.toInt()// half-dozen
invalidate()
}
}
animator.first()
} companion object {
// ...
const val PERCENTAGE_VALUE_HOLDER = "percentage"
}
- We create a
PropertyValuesHolderinstance for belongings the values that we want to breathing. In this case, we volition animate from 0 to 100 percentage. In order to create this case we as well need to pass apropertyNamethat we will utilize later on to grab the current animated value from the animator. - Hither we create an instance of
ValueAnimator, nosotros set up the property values declared before and also pass how much time in milliseconds we want the animation to last. - This will be called on every frame of the blitheness, providing us with the calculated percentage value for a specific frame. This value will be used to update the
currentPercentageblitheness later. - We become the electric current animation value
(animatedValue)from ourupdateListenerusing thepropertyNamedeclared before. - Update the
currentPercentagevariable that is used to depict our inner arc on eachonDrawphone call. - Now we call for a view redraw after we already updated the value.
- Nosotros run our animation.
Note: This blitheness will start but when the function
animateProgressget chosen.
In guild to trigger our new animation, nosotros'll need to add a Push to our activity layout in guild to perform start it when clicking the push button.
                      // ...                                                          <Button
            android:id="@+id/animateButton"
            android:layout_width="wrap_content"
            android:layout_height="wrap_content"
            android:text="breathing"
            app:layout_constraintEnd_toEndOf="parent"
            app:layout_constraintStart_toStartOf="parent"
            app:layout_constraintTop_toBottomOf="@+id/progress"            />                                // ...
And add a clickListener on our Activeness class:
          animateButton.setOnClickListener            {
            progress.animateProgress()
                        }
And there y'all go!
You lot tin find the full lawmaking hither.
Promise you enjoyed this post, yous can follow me on twitter @paulnunezm where I ordinarily tweet about Android Dev. And let delight let me know what you think in the annotate section bellow.
hollandcartheindfar.blogspot.com
Source: https://medium.com/@paulnunezm/canvas-animations-simple-circle-progress-view-on-android-8309900ab8ed
Postar um comentário for "Draw Circle Using Drawarc Android"